
Professional Water Damage Mitigation in the Bay Area: A Real Project Breakdown
If you've ever had a pipe burst or come home to a flooded kitchen, you know that panicked feeling. You're standing in an inch of water wondering what to do first, who to call, and how bad this is really going to get.
This is a walkthrough of a real water damage restoration project we handled at a Bay Area home — a supply-line failure under a kitchen sink that went unnoticed for about 18 hours. By the time the homeowner discovered it, water had spread across the hardwood flooring, soaked into the adjacent carpet, and saturated the subfloor beneath both. Here's exactly what professional water damage mitigation looks like, from the first call to final clearance.
The Call Comes In
Water damage doesn't wait for business hours. This one was discovered on a Tuesday morning. Within the hour, a technician was on-site — and before a single piece of equipment came off the truck, the inspection began.
This is where a lot of DIY water damage cleanup goes wrong. People grab a mop or a shop vac and start working before they understand what they're actually dealing with. A proper emergency water damage inspection means figuring out where the water came from and confirming the source is fully shut off, determining the water category — clean supply water, gray water, or sewage — since each requires a completely different response, and mapping exactly how far the moisture has traveled using a moisture meter and thermal imaging camera.
It also means lifting the carpet corner to see what's underneath: what type of pad, what subfloor material, whether hardwood is hiding below. And it means looking for any signs of pre-existing water damage or mold growth before the job even starts.
On this project, the thermal imaging camera picked up something the naked eye never would have caught. Moisture had crept beneath the baseboard and into the living room wall cavity — an area that looked and felt completely dry on the surface. If we'd missed it, mold would have been growing behind that wall before reconstruction even began.
Water Extraction: The Step That Determines Everything
Most homeowners have heard of dehumidifiers. Fewer understand why water extraction has to happen first — and how dramatically it affects the outcome of the entire job.
Here's the math: a professional extraction unit can pull up to 55 gallons of water per minute. A commercial-grade dehumidifier removes about 30 gallons over an entire day. Skipping thorough extraction and jumping straight to dehumidification can add days to drying time — and days mean more moisture sitting in floors and walls, raising the risk of mold growth and structural damage.
On this project, three full extraction passes ran over the carpet before moisture levels in the pad plateaued. The sequence matters too. We extracted the center of the room first, then worked outward to the perimeter — minimizing how many times furniture had to be moved and protecting the carpet from unnecessary wear. After three passes, the pad was still holding too much moisture to dry in place. That's when the call gets made: remove it, or try to save it.
What Gets Removed — and What Gets Saved
Not every water damage job requires tearing things apart. The goal is always to remove as little as possible while still achieving a complete dry. Take out too little and you leave hidden moisture that feeds mold. Take out too much and you're creating unnecessary reconstruction costs for the homeowner.
On this job, the carpet pad came out. Once it's fully saturated, pad is rarely worth saving — the math just doesn't work. The carpet itself was a different story. It was still salvageable, so it was detached carefully at the corner using a knee kicker and an awl. Wet carpet backing can be 80 to 85 percent weaker than dry, so you don't kick hard — you work it free slowly. The carpet went out for in-plant cleaning and evaluation.
The baseboards along the affected perimeter came off to open up the wall cavity for airflow. And on two walls where moisture readings were elevated above the 12-inch mark, flood cuts were made in the drywall to allow the cavities to dry properly from the inside out.
Everything removed was photographed, itemized, and documented before it left the site. That documentation goes straight to the insurance adjuster.
Setting Up the Drying System
Once extraction and demolition are done, the drying system gets engineered — not just plugged in. Equipment placement, airflow direction, and the ratio of air movers to dehumidifiers are calculated based on the square footage, material types, and the ambient humidity readings in the space.
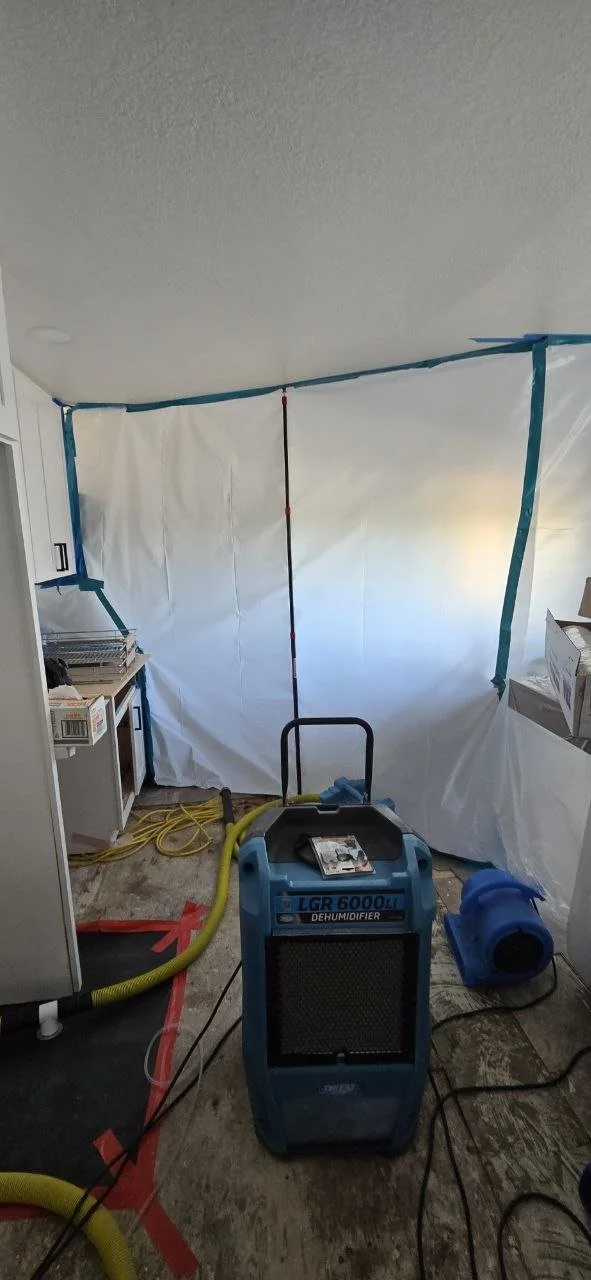
For this project, two large dehumidifiers were positioned at opposite ends of the affected zone so that humid exhaust from one wouldn't recirculate back into the other's drying field. Six air movers were arranged in a clockwise pattern around the perimeter, with additional units angled directly into the open wall cavities. A drying mat system went down over the hardwood subfloor to draw out residual moisture from below. A negative air machine maintained containment and kept cross-contamination from spreading out of the demolition area.
The structure became a controlled drying chamber. From this point forward, everything is about monitoring and adjusting — not setting and forgetting.
Five Days of Daily Monitoring
A drying system that gets set up and never revisited isn't professional water damage mitigation — it's just equipment rental. A technician came back every day to take readings at every monitoring point and log the data.
By Day 1, the subfloor was reading 22 percent moisture content and relative humidity in the space was sitting at 68 percent — active drying. By Day 3, both numbers were trending in the right direction, with subfloor moisture down to 13 percent and humidity dropping below 51. On Day 5, the subfloor hit 8 percent moisture content and relative humidity settled at 43 percent. Every monitoring point met the dry standard.
Drying was called complete when the subfloor moisture content came within acceptable range of unaffected reference material elsewhere in the house — not when it hit an arbitrary number, and not when it looked dry. When the data said so.
Clearance and Sign-Off
On Day 5, all monitoring points cleared. Equipment came out, containment came down, and a final moisture map was documented. The homeowner received a complete package: daily moisture logs, before-and-after moisture maps, equipment placement diagrams, and a full photo record from initial inspection through final clearance. That package goes to the insurance adjuster and to the reconstruction contractor so they know exactly what they're walking into.
This project went from first call to final clearance in five days. The same loss, handled without proper extraction sequencing or daily monitoring, could have taken ten or more days to dry — or it could have appeared dry on the surface while hiding active moisture in the wall cavities. The kind that gets discovered six months later when the drywall starts to bubble and the mold smell sets in. The difference between a four-day job and a four-week headache isn't luck. It's process.
